Calculations
Calculations explains how to run a calculation, understand run outcomes, and resolve common issues when a run does not complete.
Calculations Overview
Calculations Overview
What a Calculation Run Does
A calculation run evaluates the current system data in your project and produces hydraulic results based on the selected flow type and method.Inputs Required Before Running
Before running a calculation, confirm your Data Input Tables are complete and that your calculation settings match your intended scenario.Calculation Inputs You Control
Key inputs include Flow Type, Calculation Method, Calculation Imbalance Limit, Automatic Peaking, Minimum Allowable Source Pressure, Pipe Table, and Pipe Table Page. These directly affect how the system is solved and how results are reported.Running a Calculation
Running a Calculation
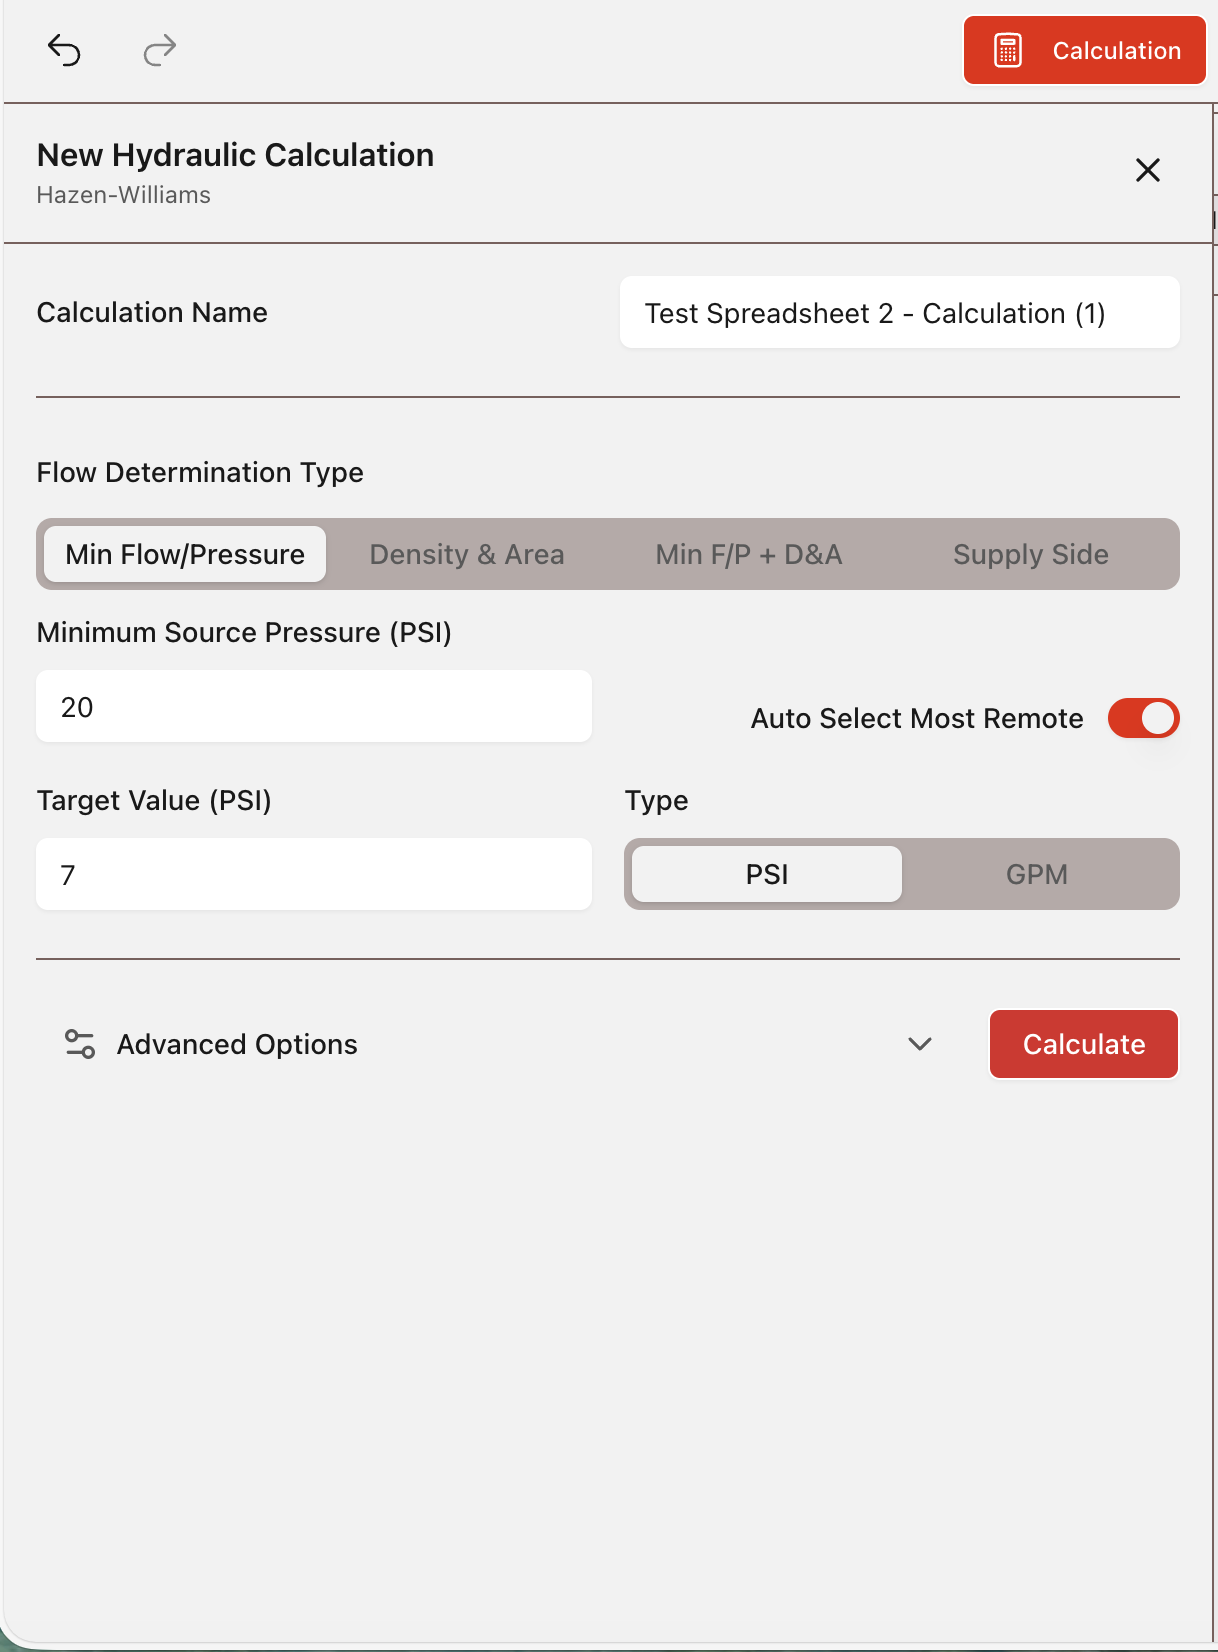
Run a Calculation
1. Open Calculation from the Toolbar.2. Enter the criteria needed for your run.
3. Select Calculate to run the current system from the Data Input Tables.
4. If the run is successful, the results dashboard opens automatically. If issues are found, the Issues panel and error references can be used to resolve the problem.
Flow Types
Available flow type modes include Minimum Flow/Pressure, Density & Area, Minimum F/P + D&A, and Supply Side.Minimum Flow/Pressure: Solves for the selected minimum end-head condition at the controlling location.
Density & Area: Solves based on required density over a selected remote area.
Minimum F/P + D&A: Applies both requirements and must satisfy the more restrictive condition.
Supply Side: Uses available supply behavior to show expected system performance at full-flow conditions.
Advanced Options
Calculation Method: Use Hazen-Williams for standard water-based sprinkler workflows. Use Darcy when project standards or fluid conditions require it.Automatic Peaking: Shifts the remote area position along branch lines to locate the most demanding location before final results.
Calculation Imbalance Limit: Controls solver precision. Lower values increase precision but may increase solve time.
Use Velocity Pressure: Includes velocity pressure effects when that reporting method is required.
Enforce Check Valves: Forces check-valve flow direction rules during solving and should only be used when applicable to the system.
Minimum Allowable Source Pressure: Sets the lowest source pressure allowed while solving for end-head requirements.
Use Legacy Pump Curve Model: Uses Classic (desktop) default pump-curve behavior for non-custom pumps when legacy matching is required. See Pump Curve Model for details and examples.
Flow Types, Calculation Method, and Pipe Table settings can also be set in Project Properties (Quick Access) from the header.
Pipe Table
Pipe Table
Pipe Table Selection
Pipe Table and Pipe Table Ranges used by calculations are set in Project Properties (Quick Access). These are commonly set during project creation and can be changed later in the same properties screen from the header.Pipe Table Page
The selected Pipe Table Page controls diameter and fitting-loss reference values used by the active calculation.View Pipe Tables
To review Pipe Table data, open Pipe Tables from the Toolbar or from the File Menu.Customizing Pipe Tables
HASS default Pipe Tables cannot be edited. To modify table data, use the Component Libraries and Pipe Tables tools to create, import, or update custom Pipe Tables.Pump Curve Model
Pump Curve Model
Legacy vs Current Model
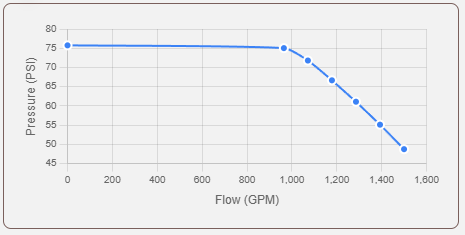
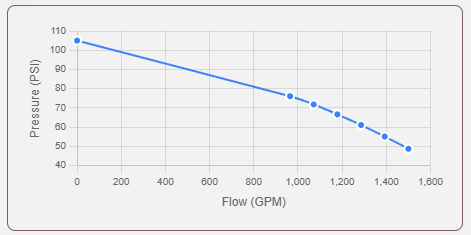
In Classic (desktop), default HASS pumps without a custom or user-defined curve used a churn pressure equal to 101% of rated pressure. This can reduce accuracy, leading to an oversized modeled pump compared to real-world pump performance.HASS Cloud uses an adjusted default pump curve with churn pressure set to 140% of rated pressure for improved accuracy.
Use Legacy Pump Curve Model
If you need results to align with Classic (desktop), enable Use Legacy Pump Curve Model in the advanced calculation options. This uses the legacy curve behavior, where pumps can show lower pressure at a given flow when required flow is below rated flow.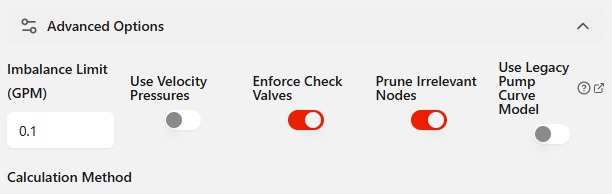
Result Reference
The calculation results indicate which pump curve model was used, so you can confirm whether the run used legacy or current behavior. For result review, see Results & Reports.Example Curves
For a 1000 gpm / 75 psi pump, the following examples show the difference between legacy and current models.Classic HASS legacy pump model:
HASS Cloud pump model:
Resolving Calculation Errors
Resolving Calculation Errors
Missing or Invalid Data Issues
1. Review the Issues panel and identify the first blocking item.2. Open the referenced table row or setting and correct the missing or invalid value in Data Input Tables or Project Properties.
3. Re-run the calculation to confirm the issue is cleared.
Configuration Conflicts
1. Confirm your selected flow type and method match your intended run.2. Verify project-level settings such as Pipe Table and method options in Project Properties.
3. Apply updates and run the calculation again.
Convergence Issues
1. If solve attempts continue without stabilizing, review the Issues panel for pressure, flow, or direction conflicts.2. Confirm end-head requirements are realistic for the available supply and that no values are out of range.
3. Review very low-flow loop segments and restrictive conditions that can prevent stable balancing, then re-run.
Retry Workflow
1. Make one correction group at a time, starting with blocking errors.2. Re-run after each correction group to isolate what changed the result.
3. If the run still fails, use Calculation Errors & Warnings, General Errors, and Data Input Warnings to match the message and apply the recommended action.